Sloped Garden Ideas: Steps, Terracing & Levels
Sloped garden ideas that actually work: terracing, cut-in steps, split levels, zig-zag paths and planting a bank — practical designs for any budget.
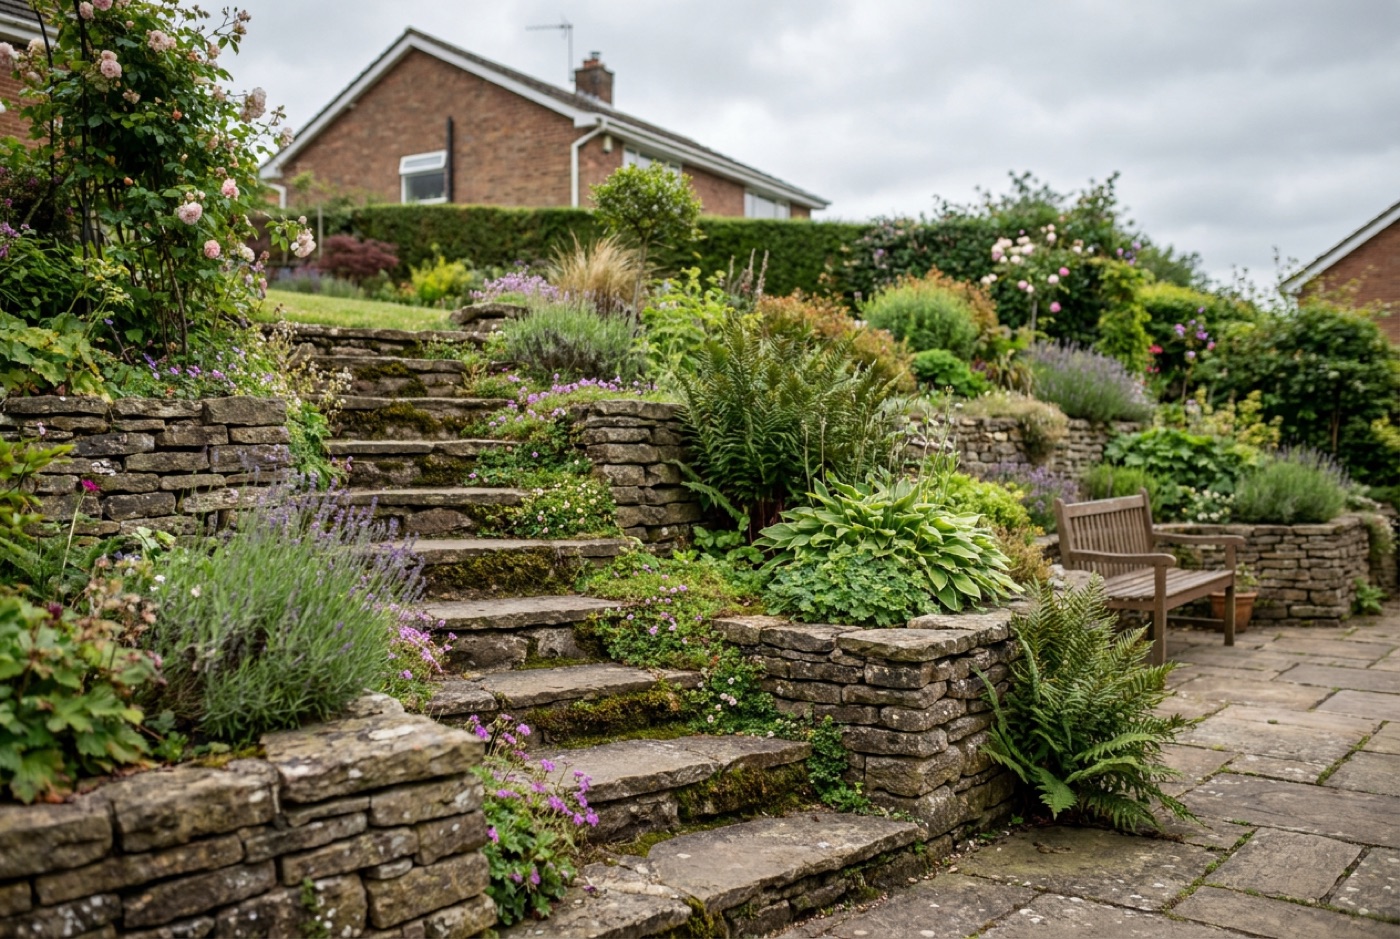
Most people see a slope as a problem. It isn’t — a change in level is the single best thing a garden can have, because it gives you drama, structure and a sense of journey that a flat plot has to work hard to fake. The trick is to stop fighting the gradient and start designing with it. The best sloped garden ideas all do the same thing: they break one awkward incline into a series of usable, level spaces connected by steps and paths, held in place by walls or planting. Get that framework right and even a steep, north-facing bank becomes a set of terraces you actually want to sit on. Below we walk through terracing, cut-in steps, split levels, zig-zag routes, planting a bank and — crucially — how to do it all without spending a fortune.
First, understand your slope
Before you buy a single sleeper, work out two things: how steep the slope is, and which way it faces. Both decide what’s realistic.
A quick way to measure the fall is to knock a peg in at the top of the slope and one at the bottom, run a string line between them dead level (use a line level or a long spirit level), and measure the height of the string above the ground at the bottom peg. That vertical drop over the horizontal distance is your gradient. A drop of one metre over ten is a gentle 1-in-10; a drop of one metre over three is steep and will almost certainly need retaining structures rather than just reshaped soil.
| Gradient | How it feels | Typical approach |
|---|---|---|
| Up to 1-in-12 | Barely noticeable | Regrade to level, or a single gentle step |
| 1-in-12 to 1-in-5 | Clearly sloped | Cut-in steps, one or two low terraces |
| 1-in-5 to 1-in-3 | Steep | Terracing with retaining walls, stepped paths |
| Steeper than 1-in-3 | Very steep / bank | Multiple retaining terraces, planted bank, professional input |
Aspect matters too. A slope that faces south is a suntrap you’ll want to sit on, so put your seating terrace and patio there. A north-facing bank stays damp and shaded, so it’s the place for a woodland-style planted slope, ferns and a path rather than a lawn that will never dry out.
Terracing: the classic answer to a slope
Terracing means carving the slope into a series of flat “shelves”, each held up at the front by a retaining wall (or a planted bank). It’s how vineyards, hillside villages and every good sloped garden have worked for centuries, and it’s still the most useful idea here because it turns unusable gradient into flat, usable ground.
How terracing works
You cut into the slope to form each level, moving soil from the high side to build up the low side — this “cut and fill” balances the earthwork so you’re not carting tonnes of spoil off site. The exposed face at the back of each cut is then held by a retaining wall. Two or three broad terraces usually look far calmer than half a dozen narrow ones, so err towards fewer, wider levels.
The height of each retaining wall is the thing to watch. Anything up to about 600mm is straightforward DIY territory; between 600mm and roughly a metre you need to think carefully about drainage and foundations; and once a wall is holding back more than a metre of earth it’s doing serious structural work and should be designed properly. Our retaining wall ideas guide walks through the materials and costs, and the broader garden wall ideas guide covers freestanding and decorative walls if you want the terraces to feel built-in rather than purely functional.
Terrace materials that suit a slope
- Natural stone walls — dry-stone or mortared, they look like they’ve always been there and suit period and cottage gardens.
- Gabions — wire baskets filled with stone; contemporary, fast to build and excellent for a steep bank because they drain freely.
- Timber sleepers — stacked and pinned, they’re the quickest and cheapest way to build low terrace walls, and perfect for a relaxed, modern look.
- Rendered blockwork — a crisp, minimal finish for a modern garden, though it needs proper footings and drainage behind.
Whatever you choose, always build in drainage behind the wall — a layer of free-draining gravel and a weep or pipe at the base — because water pressure building up behind a retaining wall is what pushes them over.
Cut-in steps: connecting the levels
Terraces are only as good as the steps between them. On a slope, steps aren’t an afterthought — they’re the spine of the whole design, so it’s worth getting the proportions right.
For comfortable garden steps, aim for a rise of 100–150mm and a going (the depth you tread on) of at least 300mm, and — this is the golden rule — keep every single step in a flight identical. Mismatched steps are the number-one cause of trips in a garden. If your total drop doesn’t divide neatly into equal steps, adjust the going or add a landing rather than fudging one odd riser.
A few step ideas that work especially well on a slope:
- Cut straight into the bank and face each riser with a sleeper, a course of frost-resistant brick or a stone bullnose — the soil does the structural work, so it’s cheap.
- Steps that double as terrace edges, where the front of each planted terrace is the riser of the step, marrying the flight and the levelling into one.
- Wide, shallow “welcoming” steps for a gentle slope, much wider than the path, so the climb feels like a series of relaxed platforms.
- A generous landing every 10–12 steps on a long flight, to break the climb and give somewhere to pause, turn or set a pot.
For the full build method, our step-by-step guide on how to lay stone garden steps covers the groundwork, mortar bed and jointing, and there are dozens more looks in our garden steps ideas roundup.
Split levels: designing with two or three zones
You don’t always need a hillside’s worth of terraces. On a gently sloping plot, the most elegant move is often to split the garden into just two or three distinct levels and let each one do a job.
A classic split-level layout gives you a dining terrace nearest the house (level, paved, easy to carry food out to), a lawn or gravel garden on the middle level, and a destination at the far or highest point — a seating spot that catches the evening sun, a summerhouse, or a raised bed of vegetables. The steps and a low retaining wall between each zone do the work of holding the levels while visually separating the “rooms” of the garden.
The advantage of thinking in zones is that it stops a sloped garden feeling like one long ramp you have to trudge up. Each level becomes a place to be, not just ground to cross. Change the surface material between levels — paving to lawn to gravel — and each room reads as deliberate.
Zig-zag and diagonal paths: taming the gradient
A path that runs straight up a steep slope is exhausting and often needs so many steps it becomes a ladder. The oldest trick in the book is to make the path traverse the slope diagonally, doubling back on itself in a zig-zag so it climbs gently across the gradient instead of straight up it.
Zig-zagging does three good things at once: it reduces the effective steepness of any one section (so you need fewer or shallower steps, or sometimes none at all), it makes the garden feel bigger by lengthening the journey through it, and each turn creates a natural spot for a bench, a specimen shrub or a pot. Curve the path rather than making hard corners and it feels like a considered stroll rather than a switchback.
Materials-wise, gravel and self-binding gravel are ideal for sloped paths because they drain freely and grip underfoot, though on the steeper diagonals you’ll want a firm edge restraint to stop the gravel migrating downhill. Stepping stones set into a grass bank suit a gentler, informal slope. For a full run-down of surfaces and layouts, see our garden path ideas guide — the diagonal and meandering layouts there are made for a slope.
Planting a bank: the low-cost, no-dig option
Not every slope needs walls and steps. If a bank is too steep to mow comfortably but you don’t want the expense of terracing, the answer is to plant it out so the roots hold the soil, smother the weeds and turn an awkward gradient into a feature in its own right.
The plants that earn their place on a bank are the tough, spreading, deep-rooting ones that knit the surface together:
- Ground-cover shrubs — junipers, cotoneaster, and low-growing hebe hold large areas with little care.
- Ornamental grasses — their fibrous roots are brilliant soil-binders and they move beautifully on a slope.
- Vigorous perennials and herbs — hardy geraniums, vinca, creeping thyme and rosemary tumble down a bank and suppress weeds.
- Lavender and cistus on a hot, free-draining, south-facing slope, where the sharp drainage suits Mediterranean plants perfectly.
The knack on a slope is getting plants established before rain washes the soil (and your new plants) downhill. Plant into the slope on a slight backward tilt so each plant sits in a shallow “shelf” that catches water, mulch heavily to lock in moisture and suppress weeds while things root in, and consider a biodegradable jute or coir matting pegged over the surface for the first year on steeper banks — it holds everything in place until the roots take over, then rots away.
Sloped garden ideas on a budget
Terracing a steep garden properly can get expensive, but a slope doesn’t have to drain your wallet. The savings come from letting the earth do the structural work and spending only on the surfaces you see and touch.
- Cut steps into the slope and face the risers with a single sleeper or a course of brick — the soil is the structure, so you only buy facing material.
- Timber sleepers are the budget hero for both low retaining walls and steps: cheap, fast, and forgiving of an uneven slope.
- Reuse the spoil. Cut-and-fill means the earth you dig from the high side builds up the low side, so you’re not paying to remove soil or import more.
- Gravel over paving for paths and terrace surfaces — it’s a fraction of the cost, drains freely and suits an informal sloped garden.
- Plant the steepest, least-used bank rather than building on it, and put your money into the one terrace you’ll actually use most.
- Phase the work. Build the framework — the main retaining wall and the steps — first, then add planting, lighting and finishes over following seasons as budget allows.
A sensible rule of thumb: spend on the structure that stops the garden moving (the retaining and the steps) and economise on the decorative finishes, never the other way round. A cheap wall that fails takes everything above it with it.
Drainage and safety: the bits people forget
Two things make or break a sloped garden, and neither is glamorous.
Drainage. Slopes shed water fast, and all of it heads for the bottom — often your house or a boundary. Build in drainage behind every retaining wall, fall paths and terraces slightly so water runs to a planted border or a soakaway rather than pooling, and never let a hard surface funnel rainwater towards the property. On a steep site, a French drain along the base of the slope can save a lot of grief.
Safety and grip. Wet British steps and slopes get slippery, so choose textured, riven or flamed surfaces over smooth sawn ones, and seal porous stone so it doesn’t glaze over with algae. On any flight used by children or older visitors, fit a handrail. Consistent step dimensions, good grip and a bit of lighting turn a slope from a hazard into the safest, most inviting part of the garden.
Putting it all together
The best sloped gardens rarely rely on one idea — they combine a few. A typical winning recipe: split the plot into two or three terraces held by retaining walls, connect them with a flight of consistent cut-in steps and a zig-zag path for the gentler route, plant the steepest bank to hold the soil, and light the steps for the evening. Start with the framework, get the drainage and step proportions right, and the finishes can follow at your own pace.
Whatever your gradient, the mindset is the same: stop treating the slope as an obstacle and start treating it as the garden’s best feature. It already has the one thing flat gardens spend fortunes trying to buy — a change of level.
FAQ
What is the cheapest way to landscape a sloped garden?
The cheapest approach is to cut steps and terraces into the slope itself and face them with low-cost materials — timber sleepers, a single course of frost-resistant brick, or compacted gravel — so the soil does the structural work. Reusing the excavated spoil (cut and fill) avoids paying to remove or import earth, and planting the steepest bank rather than building on it saves the most of all. Spend your budget on the retaining walls and steps that keep the garden stable, and economise on decorative surfaces.
How do you stop a sloped garden from eroding?
Hold the soil in place with a combination of retaining structures and planting. Retaining walls with proper drainage behind them stop the larger levels moving, while deep-rooting ground-cover plants, shrubs and grasses knit the surface of a bank together. On steeper banks, peg biodegradable jute or coir matting over the soil for the first season to hold everything until the roots establish, and mulch heavily to stop rain washing the surface away.
Do I need planning permission for terracing a garden?
Minor terracing and low garden walls usually fall under permitted development and don’t need planning permission, but there are limits — walls next to a highway are capped at 1 metre and elsewhere generally at 2 metres, and significant changes to ground levels or work affecting a neighbour’s boundary can require consent or a Party Wall agreement. Any substantial retaining wall holding back more than about a metre of earth is a structural job that should be designed properly. Always check with your local planning authority before major earthworks.
How steep is too steep for a garden slope?
There’s no hard cut-off, but a gradient steeper than about 1-in-3 (a metre of drop over three metres) is genuinely steep and needs multiple retaining terraces, stepped paths and often professional input to build safely. Gentler slopes up to around 1-in-5 can usually be handled with cut-in steps and one or two low terraces as a DIY project. Measuring your fall first — pegs, a level string line and a tape measure — tells you which camp you’re in.
What can I do with a steep bank I can’t mow?
Plant it out. A steep bank that’s awkward to mow is the perfect place for tough, spreading ground-cover — junipers, cotoneaster, ornamental grasses, hardy geraniums or, on a sunny slope, lavender and rosemary. The roots hold the soil, the foliage smothers weeds, and you never have to drag a mower across it. Add a diagonal or stepping-stone path if you need access through the planting.
Should I terrace a garden or leave the slope?
It depends on the gradient and how you want to use the space. If the slope is gentle and you’re happy with an informal, planted look, leaving it (and planting the bank) is cheaper and lower-maintenance. If you want usable flat areas — a dining terrace, a lawn, a place for children to play — then terracing into level shelves is worth the investment. Many gardens do both: terrace the part you use most and leave the steepest section as a planted bank.